Hi Everyone,
Its been an year now that we are using the beautiful beautiful Web Proxy Tool - Charles in our project. It really saved a lot of time with its cool features to test the API's.
I would like to thank my teammates Bharatesh and Smita for letting me know about this tool and its now my turn to pass on the Knowledge to the rest.
In this post I'll briefly explain how to set it up quickly and also you will see how to use its features.
Why Charles ??
- What will you do if you want to check all the response codes 200 - 500 in client when the API is up and running fine ?
- What if you had to change the request after hitting the URL / Change the response to see how app behaves ?
- What if you had a dummy response which was enough for today but now API is down ? - Sit Idle, have a cup of coffee :p
Using Charles, no more. With Charles we don't touch our code and play with API as we need.
1) Go to proxy and then SSL and add the URL's you need to record / use for debugging.


On Android :
1) Connect the Phone to Same Wifi your system is connected to.
2) Search for Install Charles Certificate in WebBrowser in Android Phone and click on highlighted link :


Now the most useful Part : DEBUGGING
Yes, Charles allows us to Edit the request and response. Eg: After the app hits a request to authenticate by sending UserName and Password. In Charles you could modify the value of the fields before they reach the destination.
Also when response comes back as a JSON / text etc, you could change it to any value you wish and also change the response code. Like you received 200 and wanted the app to test the 500, then just edit in Charles and say execute.
Please see below the Screenshots for the same : (Select an endpoint and click on Breakpoints to edit the request and response.)

MORE!!!
There are few more which I would like you guys to explore and watch for your self. One I will state below :-)
It even allows you to map the LOCAL DATA you saved in disk like JSON data and then displays the same as response. This usually helps when API's are down or not yet ready and you have a dummy data to be loaded as a response.
This way there is not code change required for the client app as it will still be pointing to same endpoints and when API's are UP, the actual data starts flowing in.
SUMMARY :
Its Awesome, time saving, requires no code changes and that's why, ITS PAID !!
You can use the trial version like I do and for few lucky people Organization pays for them and for few CRACK JACKS, Gamers we know how to use things for free without paying :p
That's all folks, I hope that was helpful.
Please leave your comments, suggestions and I would love to take them. Most Important think Keep Sharing Knowledge guys !!!
Its been an year now that we are using the beautiful beautiful Web Proxy Tool - Charles in our project. It really saved a lot of time with its cool features to test the API's.
I would like to thank my teammates Bharatesh and Smita for letting me know about this tool and its now my turn to pass on the Knowledge to the rest.
In this post I'll briefly explain how to set it up quickly and also you will see how to use its features.
(PLEASE SKIP TO 1.3 for Set up Guidlines and Using Charles with Android)
1.1 OK now for those and most, WTHell is Charles ??
- Well, Its web proxy which runs on your system. You Configure your Browser or in our case Phone so that you route all the requests via Charles Proxy. Charles will monitor and record all the requests and response being sent and received.Why Charles ??
- What will you do if you want to check all the response codes 200 - 500 in client when the API is up and running fine ?
- What if you had to change the request after hitting the URL / Change the response to see how app behaves ?
- What if you had a dummy response which was enough for today but now API is down ? - Sit Idle, have a cup of coffee :p
1.2 Solution:
For all the above we used to hardcode and mess up the code and later at some point when API's up change the code to point to actual API. Then face the regression issues , argue it was working fine, DAMN!!!Using Charles, no more. With Charles we don't touch our code and play with API as we need.
1.3 Set UP :
Download and install Charles from this link: https://www.charlesproxy.com/download/latest-release/
1) Go to proxy and then SSL and add the URL's you need to record / use for debugging.
2) Select SSL From Proxy Settings:
3) Click on Highlighted ADD icon and add the Host and Port. Eg : Host : dvp.ex..... Port : 443
Remember, the host address is the one which we will be hitting via Phone.
On Android :
1) Connect the Phone to Same Wifi your system is connected to.
2) Search for Install Charles Certificate in WebBrowser in Android Phone and click on highlighted link :

3) Scroll Down the page and click on link in highlighted box.

4) Click on highlighted "Here" link to install Charles Certificate on Phone.

5) After Installing go to Settings - Security - Trusted Credentials and under User Tab you can see the installed Charles Certificate

6) Now Go to Wifi Settings and set the proxy as IP address of your system and port as 8888


Now all the Requests from your phone can be monitored in Charles as it will be routed via Proxy.
Lets see how it looks in real time :
In my app I hit the URL and as you see the Charles recorded it and gave me the entire details of the same.
You can see the URL, Request Headers, Response and Response Code.
Just Click on appropriate tabs to access the details.

Now the most useful Part : DEBUGGING
Yes, Charles allows us to Edit the request and response. Eg: After the app hits a request to authenticate by sending UserName and Password. In Charles you could modify the value of the fields before they reach the destination.
Also when response comes back as a JSON / text etc, you could change it to any value you wish and also change the response code. Like you received 200 and wanted the app to test the 500, then just edit in Charles and say execute.
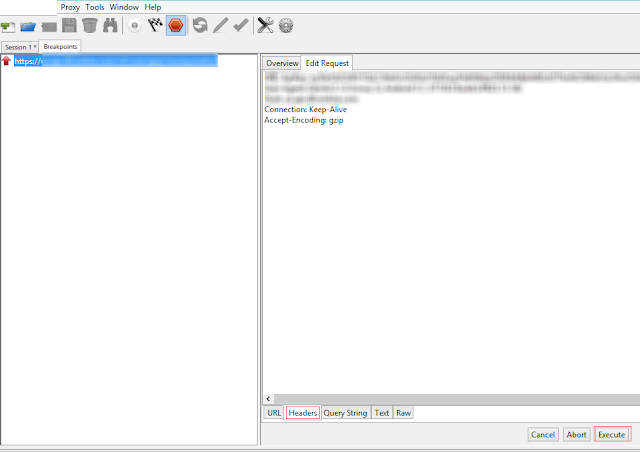
Please see below the Screenshots for the same : (Select an endpoint and click on Breakpoints to edit the request and response.)

As shown below the Red Up Arrow indicate request breakpoint. Use the specific tabs, edit the required fields and click execute.

Same goes for editing the response. See Below


MORE!!!
There are few more which I would like you guys to explore and watch for your self. One I will state below :-)
It even allows you to map the LOCAL DATA you saved in disk like JSON data and then displays the same as response. This usually helps when API's are down or not yet ready and you have a dummy data to be loaded as a response.
This way there is not code change required for the client app as it will still be pointing to same endpoints and when API's are UP, the actual data starts flowing in.
SUMMARY :
Its Awesome, time saving, requires no code changes and that's why, ITS PAID !!
You can use the trial version like I do and for few lucky people Organization pays for them and for few CRACK JACKS, Gamers we know how to use things for free without paying :p
That's all folks, I hope that was helpful.
Please leave your comments, suggestions and I would love to take them. Most Important think Keep Sharing Knowledge guys !!!
